How To Create a Drop Down Menu in Shopify (with best practices)
Drop-down menus are a great way to pack more links into your top menu without making the whole website look messy.
It’s especially useful in regards to Shopify stores which, oftentimes, offer many categories of products, and listing them one-by-one would really clutter the menu.
In this article, you’ll find all the information you need regarding how to create a drop down menu in Shopify and the best practices to take into account when making a Shopify dropdown menu.
Ready to go?
Table of contents:
How to create a Shopify drop down menu
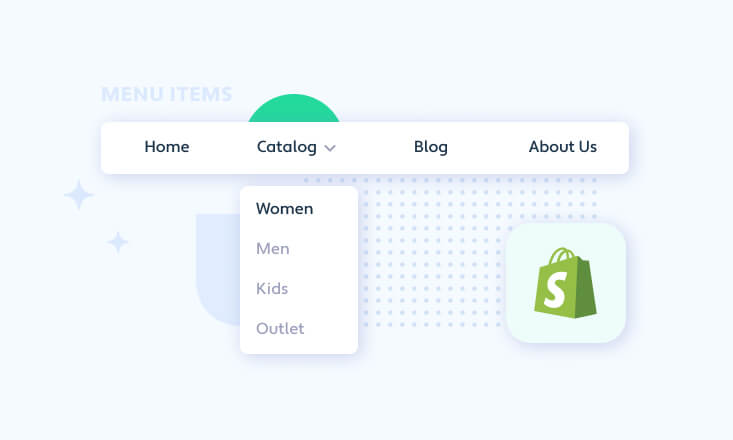
To create our Shopify dropdown menu we have to, at first, create a regular menu.
Keep in mind that all Shopify themes have a main menu and footer menu by default so this step might be negligible in your case.
How to create a Shopify menu
To create a Shopify menu, open your Shopify Admin Dashboard and go to Online Store-> Navigation.
There click on the Add menu, give your menu a name, and add links for all the items you’d like your menu to cover.
All done! Now, let’s move onto creating a drop-down menu in your Shopify store.
How to create a Shopify drop down menu
First, open your Shopify Admin Dashboard and go to Online Store-> Navigation.
In there, you’ll see your Main menu and a Footer menu, plus any other menus that you’ve created. You can create a drop-down menu from any link in the Main menu
From your Shopify admin, click Online Store, and then click Navigation (or press G W N).
The navigation page of most new stores has both the Main Menu menu and a Footer menu. You can make drop-down menus on your storefront from any link in the Main Menu which means you can make a drop-down menu from an existing link, or add a new link to the main menu first, to use as the head of your drop-down menu before proceeding.
Below, I’ll show you how to make a Shopify drop down menu from the existing link.
Next, click the Add menu button and give your menu the same name as the name of the link in your Main Menu that you wish to drop-down from.
Then, click the Add menu button item one time for each link you want to include in your drop-down menu. For each link, you’ve clicked to add, give it a name, then click the Link drop-down box and choose your destinations for these links.
Click save!
And that’s it. You’ve just created a new Shopify drop down menu.
Now, we’ll go through the best practices when it comes to creating a drop-down Shopify menu so the one you create is perfect!
Best practices for how to create a drop down menu in Shopify
Now that you know how to create a drop down menu in Shopify it’d be wise to get you through the best practices of a drop down menu.
As I’ve mentioned before, drop-down menus can be a great way to declutter your website. Yet, it’s easy to go the other way and make drop-down menus a complete mess that your customers will have trouble going through.
So, let’s go through the most important do’s and don’ts so you don’t make these mistakes!
Proper links naming
The #1 reason to create a drop down menu is to declutter your top menu that may quickly get cluttered with tens of different items, categories, and links.
Yet, it’s important to keep in mind that drop-down menus make it unable for your visitors to see all the links at once. And that’s what makes links naming so important.
Keep in mind that your visitors won’t see what’s underneath every top link. That’s why you have to be very careful with these names. These can be neither too broad nor too specific. They have to cover the whole category in a clear way so the person who sees it for the first time knows whether an item that they’re interested in is there or not.
A good practice is to get rid of industry-specific words that could be tricky to understand. The deeper you do, the more specific these links should become.
Think of them as a country’s map.
At first, you look at the name of the country, then its specific state, province, or voivodeship. Next, you look for a county, parish, and a specific city. Even then you can look for a specific district, neighborhood, and street name.
The further your customers go the more specific you have to be.
Keep it simple
Again, we’re going back to the main principle of why create a sub-menu at first.
Because the #1 reason is to declutter your menu, it’s important to keep your sub-menu clean and approachable. This means you shouldn’t put too much in there, as well as, you shouldn’t overdo such things as adding the same links too many times or adding too many links to one collection.
At first, it might seem very tempting to add more links to a drop-down menu so they “disappear” from the top bar of your website but the more you add the more quality you *actually* subtract from your drop-down menu.
Keep it simple and don’t overdo it. Put the quality first over the quantity and it’ll soon result in your customers’ satisfaction.
Nest when you can
A great way to put more into your drop down menu is to nest links. Yet, this (as any previous aspect) can be tricky.
Nesting often results in creating a staircase-like drop down menu. This is really bad as one bad move may result in a visitor having to go through the whole path again.
If you find yourself making such a staircase drop-down menu it’s worth revisiting your collections to find a better way of structuring your menu. You should include no more than two or three steps. More means more mess.
Again, keep it simple and approachable and remember what’s the main purpose behind your brand new Shopify dropdown menu.
Now you know how to create a drop down menu in Shopify!
Okay, we’ve come to an end!
At this point, you should be able to create a perfect Shopify drop down menu that will help you declutter your store’s website and make it much easier to shop.
Wish you a high CTR and till the next!
Provide excellent service with customer details at your hand
Channels is a data-driven phone system that connects with your Shopify store so you know every customers’ details upfront…
How?
Channels collects customer data that you store in Shopify and makes it accessible through a neat tool called Customer Card. This appears every time you handle a customer call.
With all the details such as call recordings, full name, and latest orders you’ll be able to solve your customers’ problems in minutes if not seconds!
On top of that, you get all the essential features of a phone system such as:
- Mobile app
- Virtual phone numbers
- Free Incoming calls
- IVR/Auto-attendant
- Click-to-call
- Call recordings
You can try Channels for free for 7 days. Plus, we give you a free phone number and a few $$$ so you can fully test our software!


